Notes and Task
Overview
The Notes feature can be used to assign tasks to other users and to leave comments and remarks against different areas, features, and functionalities on Data Governance Tool. Notes can be categorized as -- To do, Important, Question, Idea or Critical as per the requirement.
Here, notes can be made against different Systems.
Only users who have permission to view or reply to Notes can access the Note or Task.
Notes can be created from Datamaps, Survey, and Risk Register modules.
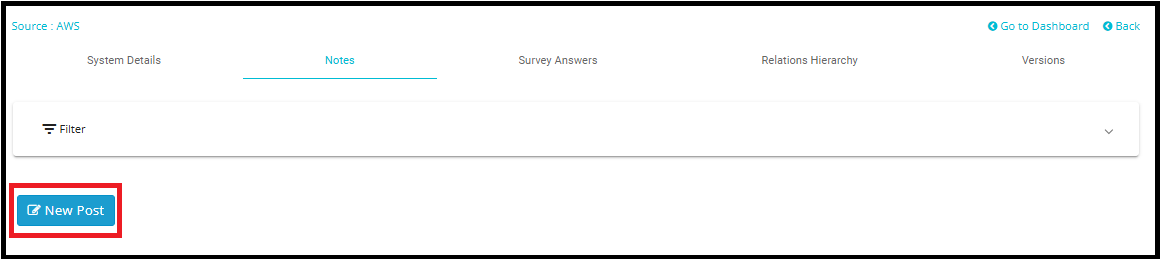
To create a new note
- Click on New Post.
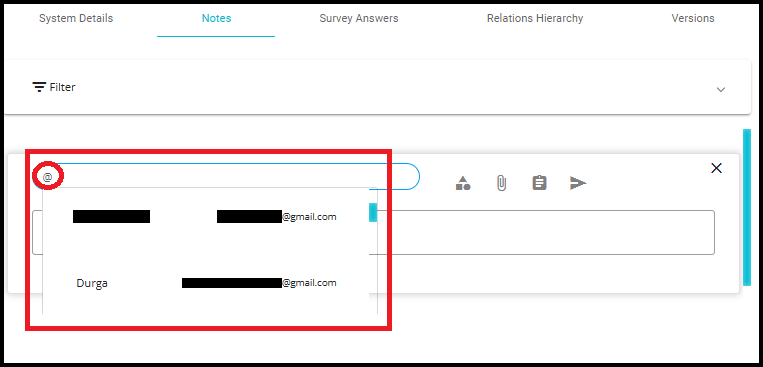
 2. To ensure important updates and tasks are promptly seen, use the "@" symbol followed by the user's name when composing a note in the Add a Post field. This will trigger a dropdown list of users to tag. Once tagged, the note will automatically appear in their Dashboard under Messages in the Notifications section, helping streamline communication and accountability.
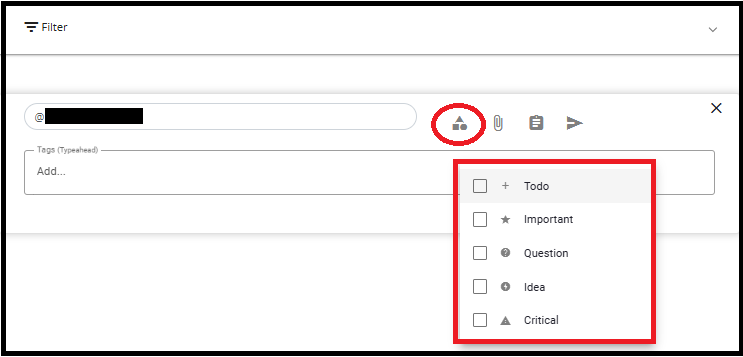
- Categorize the Note by clicking on the Categories icon and selecting a category from the drop-down menu.
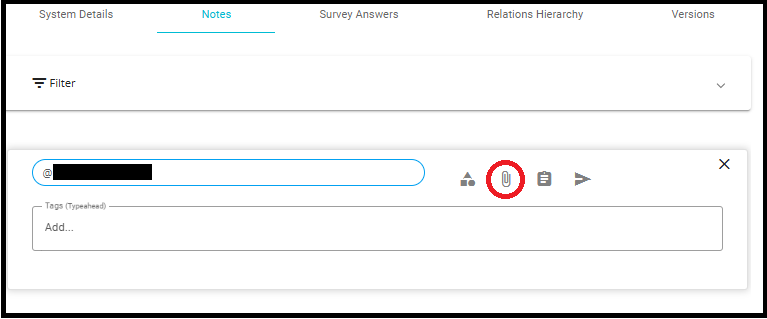
- Add an attachment if needed.
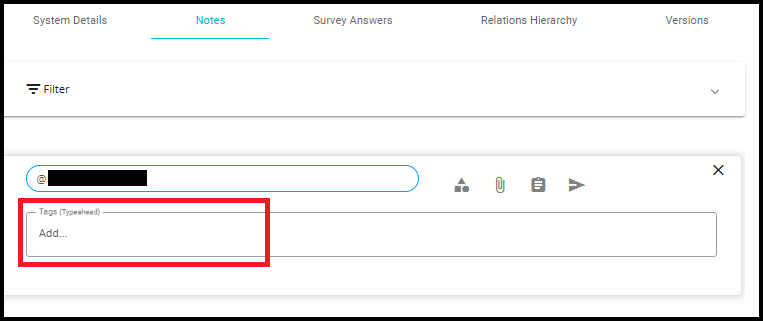
- If you want to add any tags to help categorize or filter the note later, you can enter them in the "Tags" field.
- Click on the Task icon; the Task configuration pane will open.
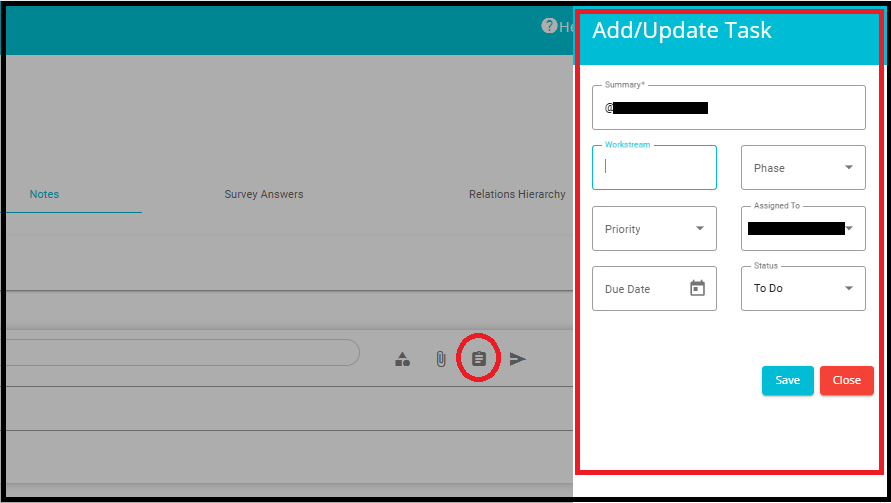
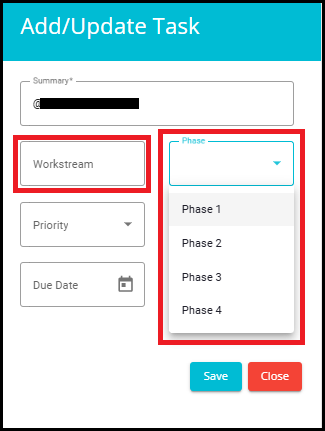
Workstream: Here you can add the name of the workstream to which the note would belong.
Phase: From the drop-down menu, select the Phase that the task is in.
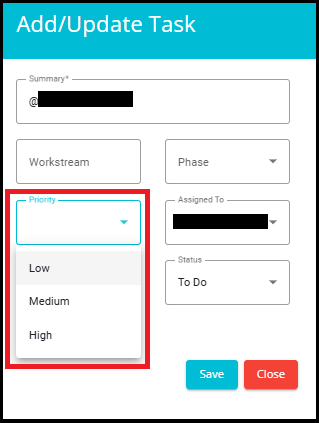
- Priority: Set the priority level for the task.
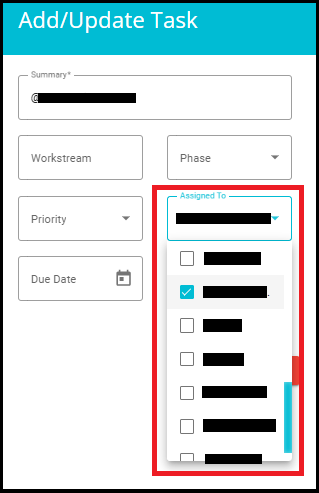
Assigned to: Select the users to whom the task is to be assigned.
After you tag a user, their email address will be selected by default in the 'Assigned To' field of the task window.
The checkbox for that user is checked by default because the user was tagged. This behavior occurs only if the tagged user already exists in DGT.
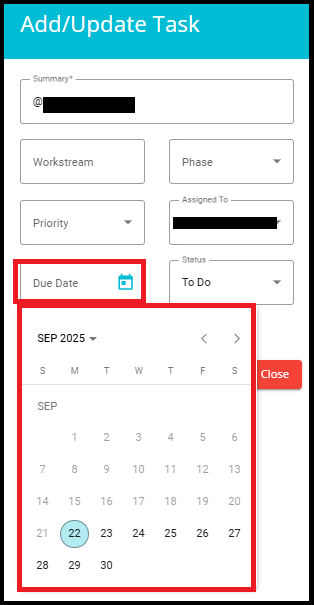
- Due Date: Set the date by which the task is to be completed.
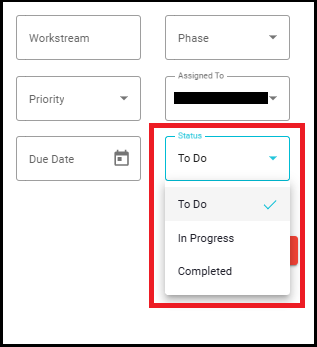
- Status: Select the current status of the task.
- Once the task has been configured, click Save or click on Send icon to post the Note.


- After clicking the Send icon or Save button, your note will appear in the notes section as shown in the interface.
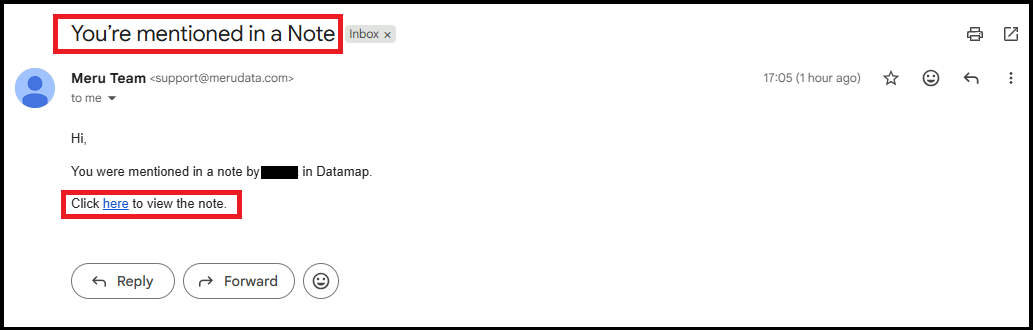
Additionally, the tagged user will receive an email notification stating that they were mentioned in a note, along with a link to view the note.
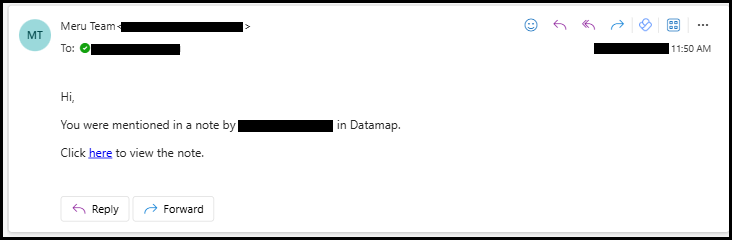
When a user clicks the link received in the email notification, the system automatically navigates to the exact note and scrolls to the highlighted section. If the note includes an associated task, the task panel will also open on the right side, displaying the complete task details.
From here, you can:
View the note and its details.
Archive the note using the archive icon to store it for future reference.
Edit the note by clicking the pencil icon to make changes.
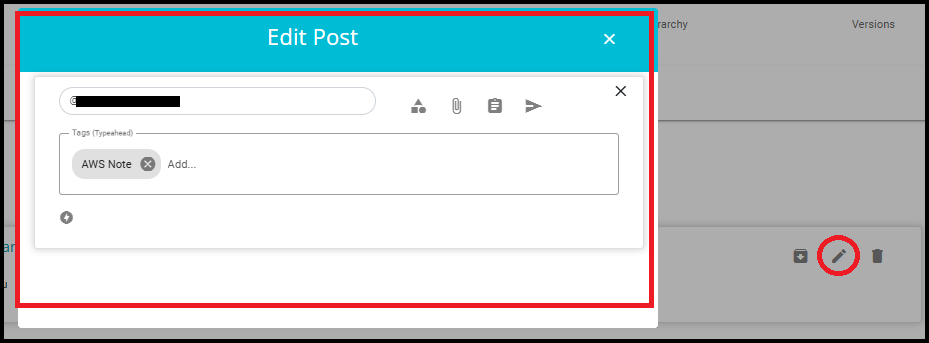
- Delete the note using the trash bin icon if it's no longer needed.
Note: Only the creator of the Note/Task has permission to delete it.
To view or edit a Task linked to a Note:
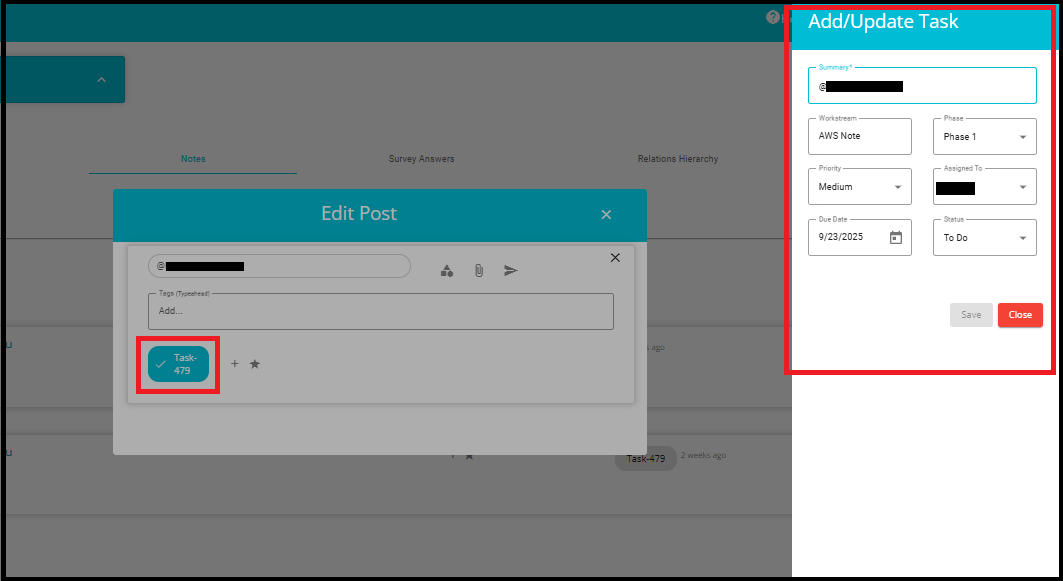
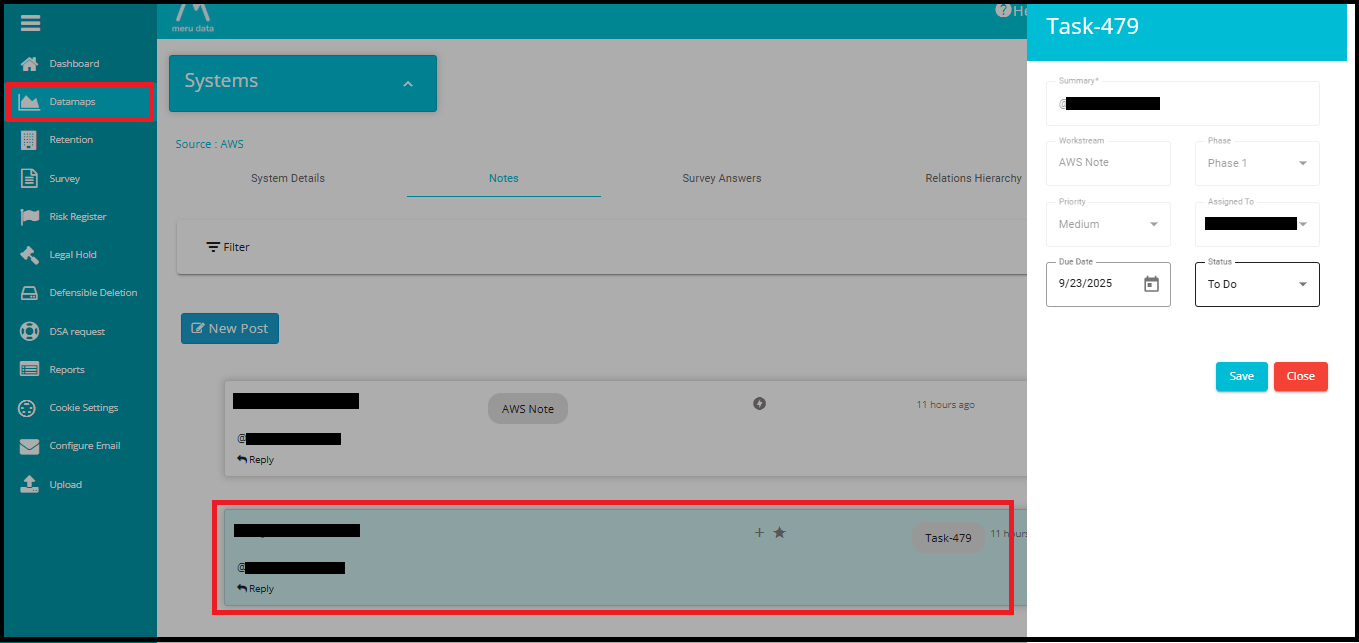
- Click on the Task ID Chip (e.g., Task 479) visible within the note interface.
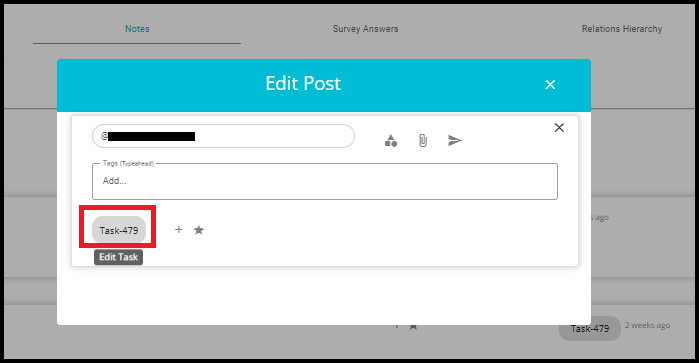
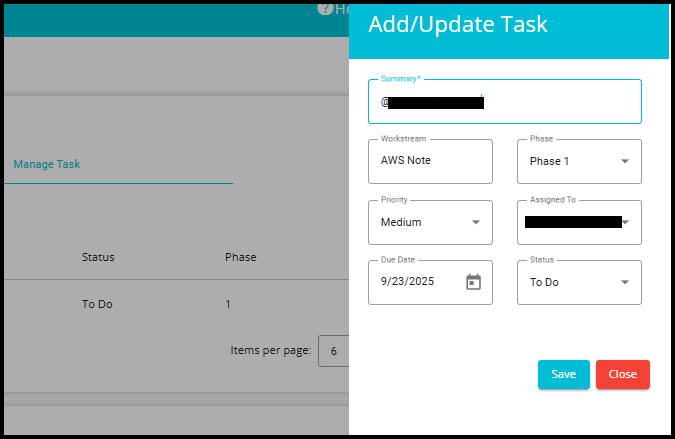
This action will open a new screen titled "Add/Update Task".
In this screen, you can:
a. View and modify the Summary, Workstream, Phase, Priority, Assigned To, Due Date, and Status.
b. After making changes, click Save to update the task or Close to exit without saving.
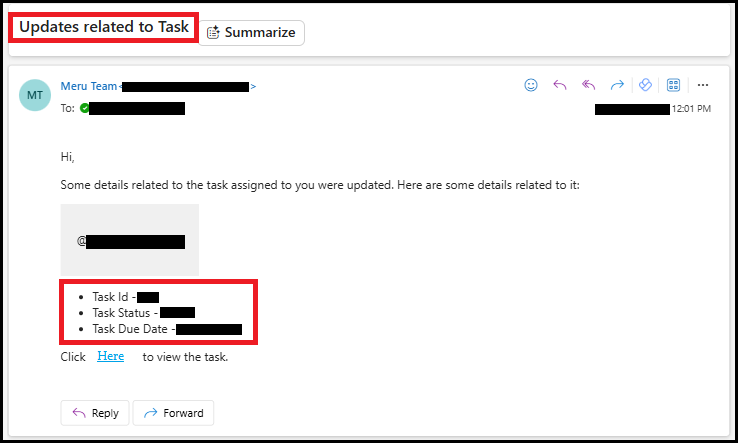
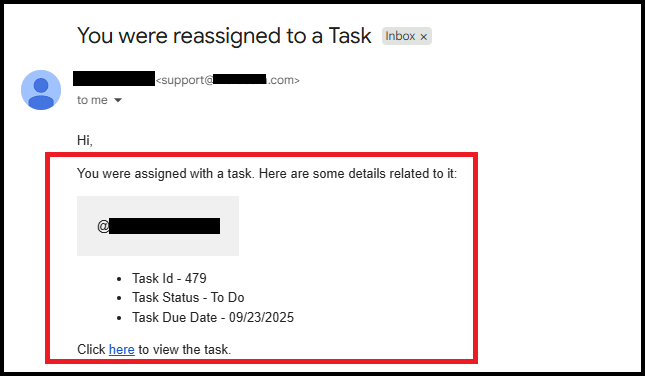
When a user updates the task, the tagged user will receive an email notification. This email includes details such as Task ID, updated Task Status, and Task Due Date, along with a link to view the task.
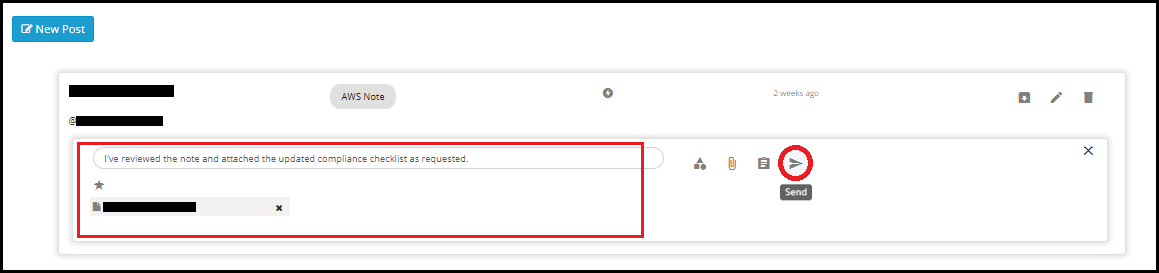
To reply to a Note/Task as a tagged user, click on the Reply button located below the note or task. This opens a comment input box.

Type your reply in the comment input field that appears after clicking the Reply button.
You can enhance your response by:
Attaching files using the attachment icon.
Selecting categories to classify appropriately.
Add tags to help with future filtering or categorization.

Click on the Send icon to post your reply.
Your comment will now be visible under the note/task thread.
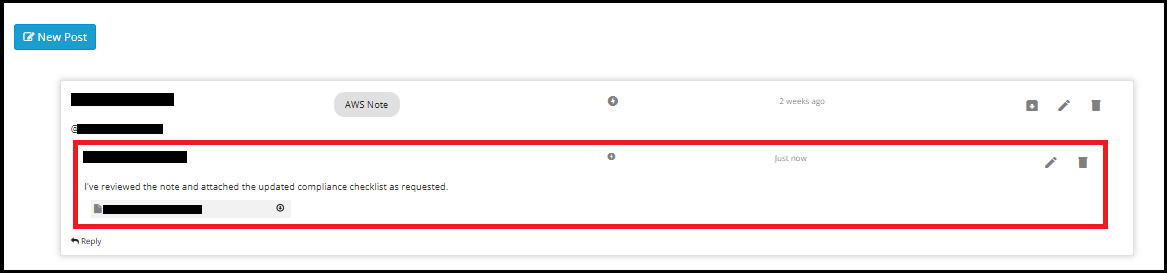
The user who posted this comment can click the Edit icon to modify the content of their reply and delete the comment entirely by clicking on the Delete icon.

- Once the note is sent, the tagged users (those mentioned using the "@" symbol) can view it on their Dashboard under the Notifications section, in the Messages tab.
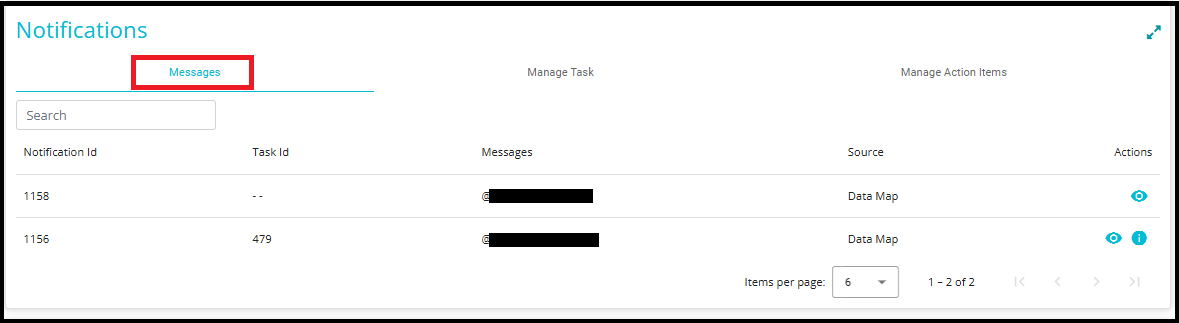
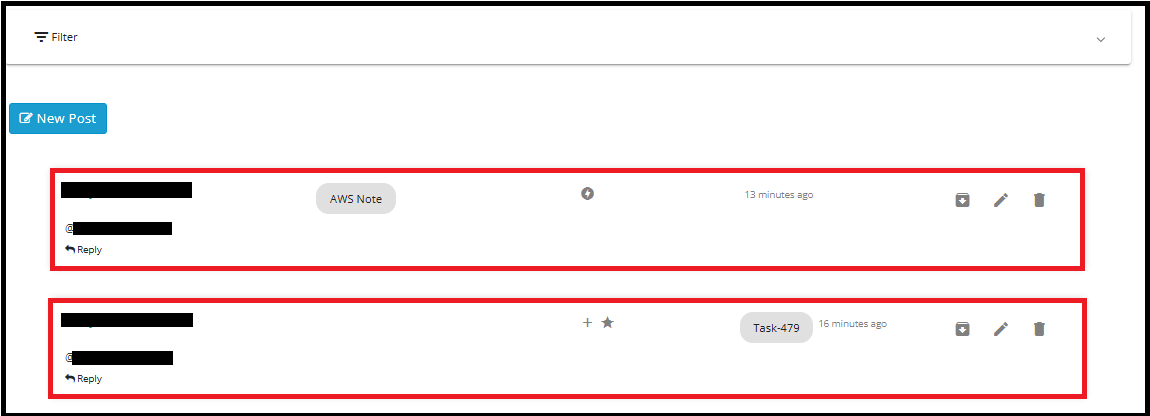
- Normal Note: This type of note is meant for quick updates or one-time communication.
Example: Notification ID 1158 -- This note has no associated Task ID (shown as "--").
Once the user opens it, the note will disappear from their dashboard.
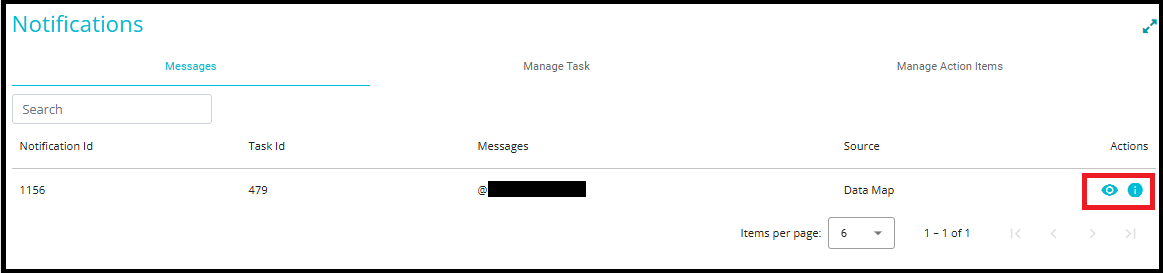
- Note with Task: This type of note is linked to a specific task and remains visible until the task is marked as completed.
Example: Notification ID 1156 -- This note is linked to Task ID 479.
It will stay on the dashboard until the task is marked as completed.
When the View Note icon is clicked, the system redirects the user to the module specified in the "Source" field.
For example, in this case, the Source value is "Data Map", so the system redirects to the Datamaps module.
If the source were something else (e.g., Survey, Risk Register), the redirection would go to that respective module.
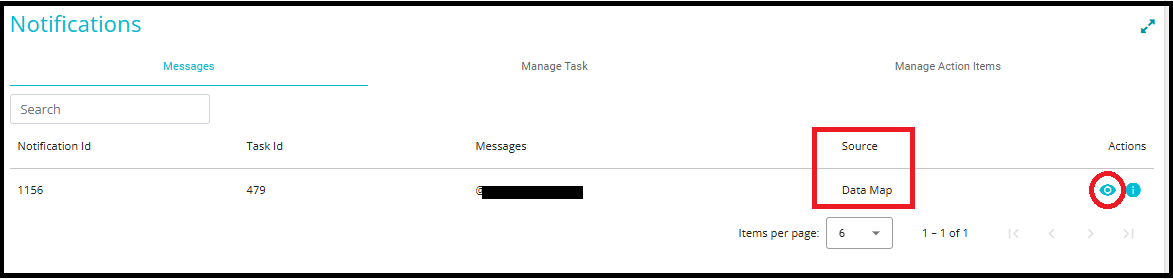
The module opens directly to the Notes tab of the relevant system.
The specific task (e.g., Task-479) is automatically highlightedand expanded to show full details.
- To manage notes that are linked to tasks, go to the Manage Task tab under the Notifications section.
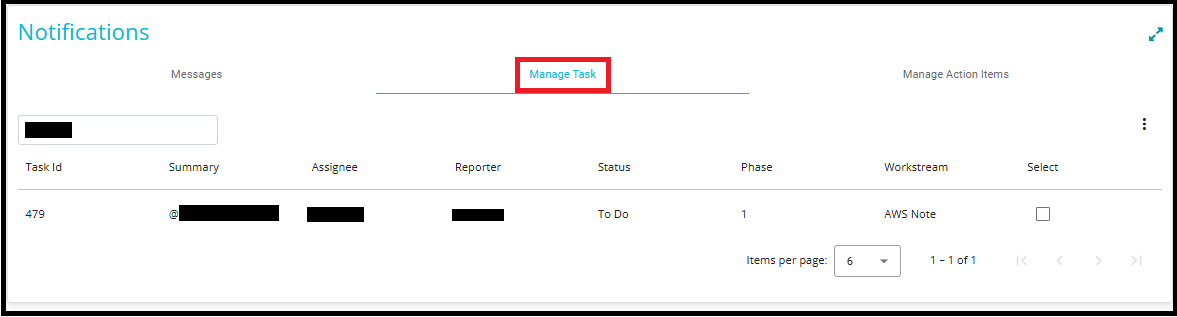
- To open or update a task, simply click on any column value in the row. This will open the Add/Update Task window, allowing you to view or modify task details.
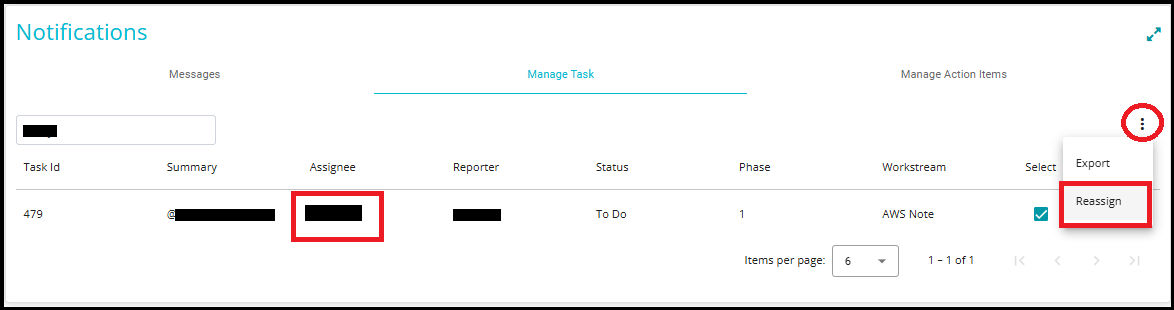
1. Accessing the Reassign Option:
Navigate to the Manage task tab under the notifications section.
Locate the task you want to reassign (e.g., Task ID: 479).
On the right side of the task row, click the three-dot menu icon(⋮).
From the dropdown, select "Reassign."
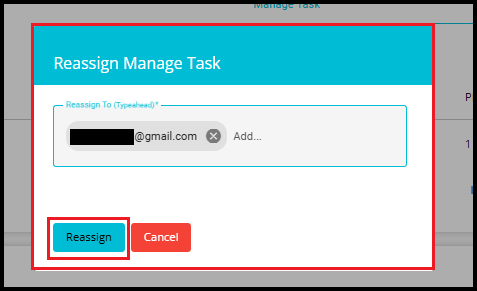
2. Reassignment Window:
A small popup window appears allowing you to:
Select a new assignee.
Click on the Reassign Button.
3. Email Notifications:
- After reassignment: The previous assignee receives an email stating: "You were removed from the task."

The new assignee receives an email stating: "You were assigned a new task."
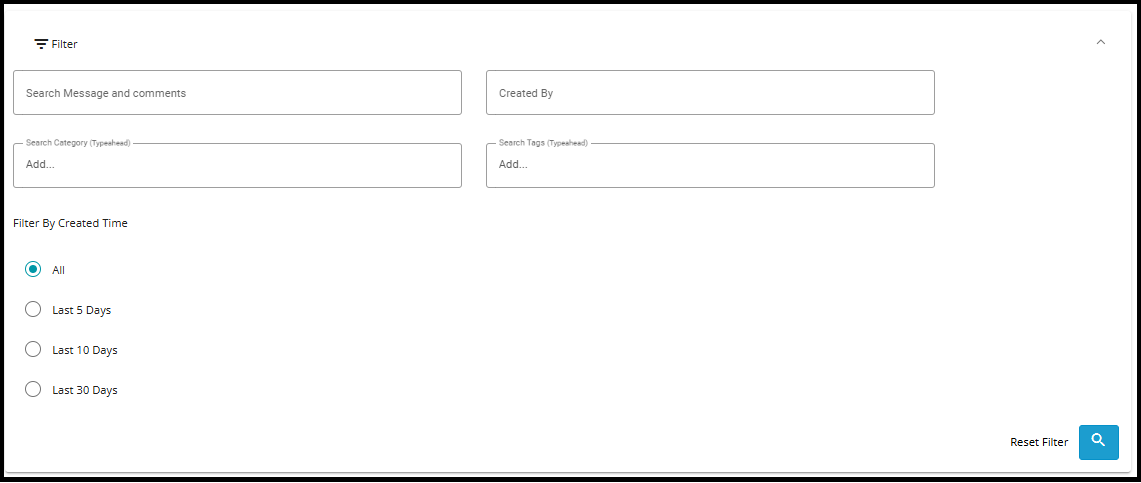
To search for a Note
- Click on Filter.

- Here you can search for Notes by their content/message, the name of the user it was created by its' category or its Tags. Notes can also be filtered by time.
Steps to Create New Users from Notes/Task
Add New User in the Note
In the Add a Post field, type the email address after the '@' of the new user you want to add.
Optionally, select a Category, add an Attachment, and then click the Send icon.

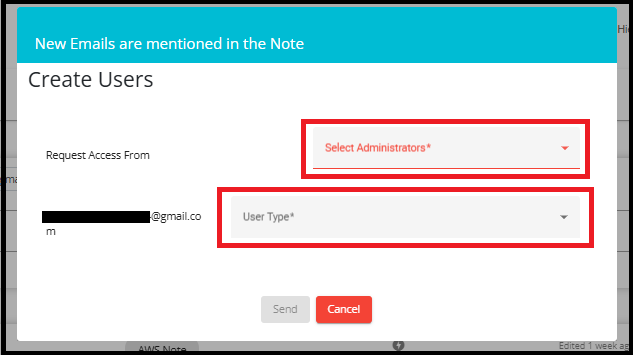
- If a normal user is creating a new user, the Create Users screen will appear.
This window includes:
Request Access From: Displays the email address of the new user.
Select Administrators: A dropdown to choose an administrator who will approve and assign the required permissions to the user.
User Type: A dropdown to select the type of user (e.g., NormalUser, ExternalUser, SSO, etc.).
These fields are mandatory because new users do not have direct access by default.
- Click Send after selecting the required options.
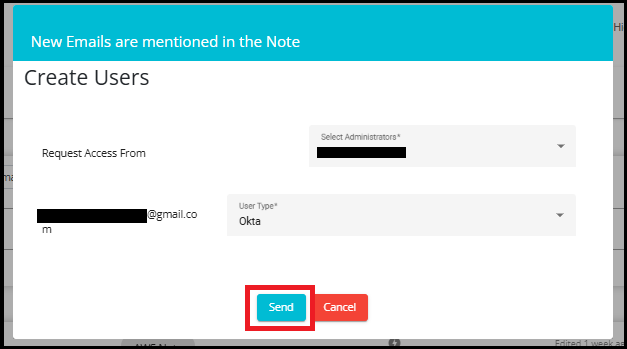
- The administrator you selected will receive an email notification with a link to add the user to a user group.
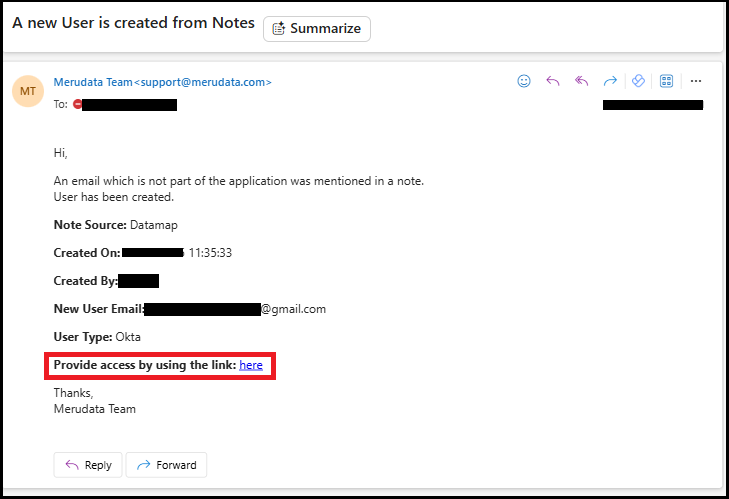
- The new user will also receive an email notification stating they were mentioned in a note.
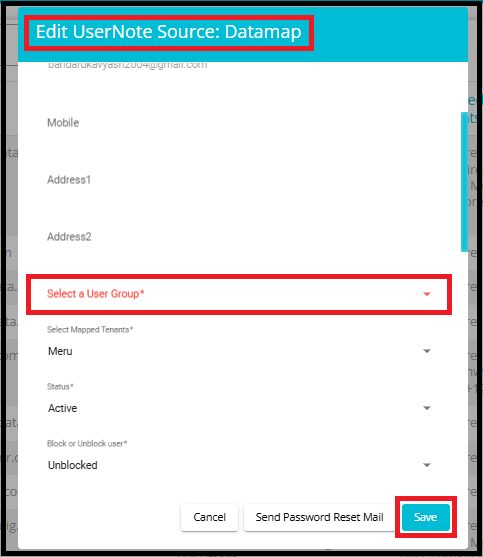
When the administrator clicks the link in the email, they are redirected to the Edit User Note window.
After selecting the appropriate User Group, click Save to complete the process.
Adding the user to a User Group ensures they have the necessary permissions to access Notes/Tasks within the system.
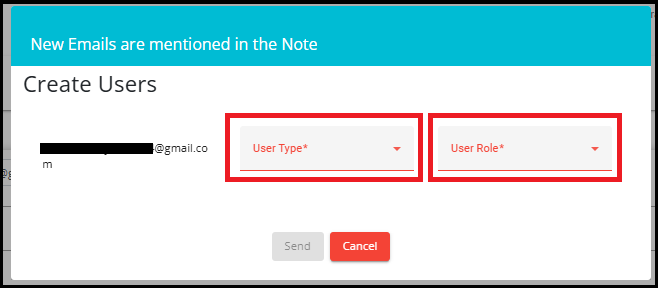
If an admin is creating a new user, the Create Users screen will appear.
This screen includes:
The email address of the user being created.
User Type: A dropdown to select the type of user (e.g., NormalUser, ExternalUser, Okta, etc.).
User Role: A dropdown to assign the user's role within the system.
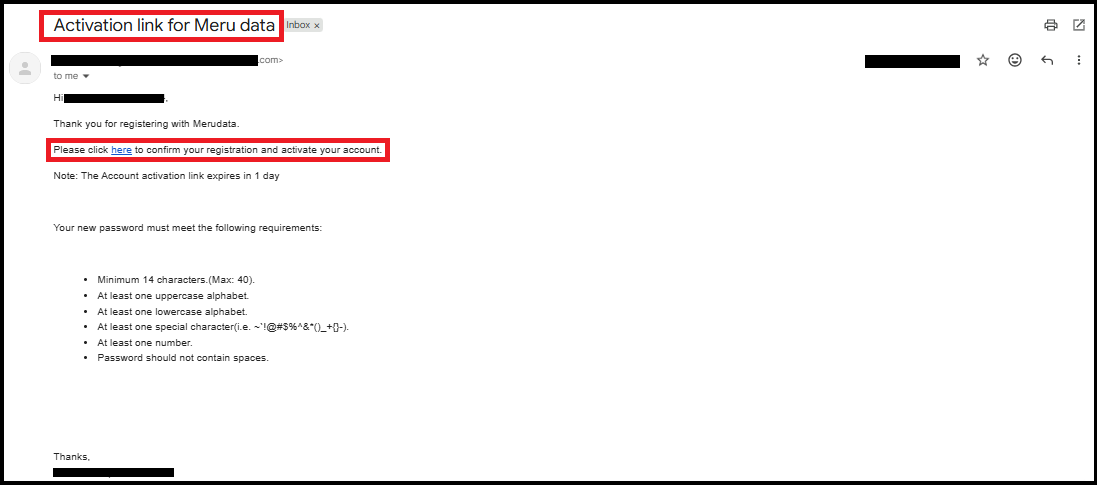
After clicking on the send button, the new user will receive an email containing an activation link.
The activation link allows the user to confirm their registration and activate their account.
The email also includes password requirements and instructions to ensure secure account setup.
Note: The activation link will expire in one day, so the user must complete the activation process within this timeframe.